Quick Start Guide
Here we provide a quick tutorial on how you can set up a one page web application using the library from scratch. The guide will also show you how to setup patternfly assets with webpack:
All the code used can be found here.
Create a new github repo for your project and clone it (later on we'll be adding a submodule to your local repo).
We will be using Python Flask to serve our web assets, but the code is minimal and you are welcome to use any other web framework to serve your files.
Throughout the tutorial we'll be using the following folder structure:
 project_folder/

 |--app/
    |--backend/
       |--static/
          |--build/                  # webpack bundled files and assets are stored here
          |--main.css                # all custom css will be stored here
       |--templates/                # flask templates
          |--index.html
       |--server.py                 # flask server
    |--javascript/                 # react/redux source code will be stored here
       |--index.js
 |--node_modules/
 |--package.json
 |--webpack.config.js
If you are unfamiliar with some of the files, do not worry, this is simply to give a brief overview of what the project structure will end up looking like.
Setting up Server (Flask)
If you would like to use flask, and you need to install it you can find instructions here.
Create the app and backend directories, in the backend directory create a file called server.py, enter the following lines of code:
from flask import Flask
from os import environ
from flask import render_template

app = Flask(__name__)

@app.route("/")
@app.route("/second_page")
def home():
    return render_template('index.html')

if __name__ == "__main__":
    port = int(environ.get("PORT", 8081))
    app.run(host='0.0.0.0', port=port)
Notice that both routes serve the same page, this is because we want the front end to handle the various pages that will be displayed via the Navbar.
Now create an index.html similar to the one below and store it in the templates folder:
<!doctype html>
<!doctype html>
<html lang="en">
  <head>
    <link rel="stylesheet" href="../static/build/css/patternfly.min.css">
    <link rel="stylesheet" href="../static/build/css/patternfly-additions.min.css">
    <link rel="stylesheet" href="../static/build/css/react-bootstrap-table.css">
    <link rel="stylesheet" href="../static/main.css">
    <meta charset="utf-8">
    <meta name="viewport" content="width=device-width, initial-scale=1, shrink-to-fit=no">
    <meta name="theme-color" content="#000000">
    <title>Pattern Fly Template</title>
  </head>
  <body class="cards-pf">
    <div id="root"></div>
    <script src="../static/build/main.js"></script>
    <script src="../static/build/app.js"></script>
    <noscript>
      You need to enable JavaScript to run this app.
    </noscript>
  </body>
</html>
We are now done with server side code!
Run the following command from project root to start the server:
python app/backend/server.py
You can try to visit the 3 different routes to see if they work, but the server will not be able to serve the scripts/css until we setup webpack.
You will notice in index.html that we are importing stylesheets and scripts from the static/build folder, but we haven't created on yet. This is where webpack will help us out, we can use webpack to bundle all our react/redux code alongside packaging and copying our patternfly assets into the build folder.
NPM
Go into your project root and run:
npm init
Go through the setup for your npm project, once done you should have a package.json in your project root directory. Copy/paste the dependencies and scripts listed in the package.json example below into your package.json:
{
  "name": "Patternfly-React-Template",
  "version": "0.1.0",
  "dependencies": {
    "babel-core": "^6.24.1",
    "babel-eslint": "^7.2.3",
    "babel-loader": "^7.0.0",
    "babel-plugin-transform-runtime": "^6.23.0",
    "babel-preset-es2015": "^6.24.1",
    "babel-preset-react": "^6.24.1",
    "babel-preset-stage-2": "^6.24.1",
    "copy-webpack-plugin": "^4.0.1",
    "d3": "^4.10.2",
    "ejs": "^2.4.1",
    "eslint": "^4.3.0",
    "eslint-loader": "^1.9.0",
    "eslint-plugin-react": "^7.1.0",
    "object-assign": "^4.1.1",
    "patternfly": "^3.25.1",
    "prop-types": "^15.5.10",
    "react": "^15.6.1",
    "react-bootstrap": "^0.31.2",
    "react-bootstrap-table": "^3.5.1",
    "react-css-transition-replace": "^2.2.1",
    "react-dom": "^15.6.1",
    "react-modal": "^2.2.2",
    "react-redux": "^5.0.5",
    "react-router-bootstrap": "^0.24.2",
    "react-router-dom": "^4.1.2",
    "redux": "^3.7.2",
    "redux-thunk": "^2.2.0",
    "webpack": "^2.5.1"
  },
  "scripts": {
    "start": "npm run build",
    "dev": "webpack -d --watch",
    "build": "webpack -p",
    "test": ""
  },
  "devDependencies": {
    "script-loader": "^0.7.1"
  }
}
The dependencies will be used by the library and the web app in this tutorial.
The scripts object defines the commands that will run webpack and bundle the required files needed. In dev mode webpack is ran with a watcher that will automatically re-bundle any js/jsx files for you after a new change.
Go to your project root once again and run the following command to install all our dependencies:
npm install
Webpack
Create a new file in your project root called webpack.config.js , this file will contain all your webpack configurations. Copy the contents below into this new file:
var CopyWebpackPlugin = require('copy-webpack-plugin');
var webpack = require('webpack');
var path = require('path');

module.exports = {
  devtool: 'source-map',

  // main will import patternfly/bootstrap js code,
  // while app will serve as the bundle of our react/redux code
  entry: {
    'main': './app/javascript/main',
    'app': './app/javascript/index.jsx'
  },

  // the following lets webpack know to create 2 bundled output files in static/build: main.js and app.js
  output: {
    path: path.join(__dirname, '/app/backend/static/build'),
    publicPath: './',
    filename: '[name].js',
  },

  // Jquery imported into global context from main (using script-loader)
  externals: {
      "jquery": "jQuery",
  },

  plugins: [
    new webpack.IgnorePlugin(/^\.\/locale$/, /moment$/),

    // Global jquery is provided to any webpack modules
    new webpack.ProvidePlugin({
      $: 'jquery',
      jQuery: 'jquery',
      'window.jquery': 'jquery',
      'window.jQuery': 'jquery',
    }),

    // This plugin will copy all the patternfly non js assets into static/build
    new CopyWebpackPlugin([
      {
        from: { glob: './node_modules/patternfly/dist/img/*.*'},
        to: './img',
        flatten: true
      },
      {
        from: { glob: './node_modules/patternfly/dist/fonts/*.*'},
        to: './fonts',
        flatten: true
      },
      {
        from: { glob: './node_modules/patternfly/dist/css/*.*'},
        to: './css',
        flatten: true
      },
      {
        from: { glob: './node_modules/react-bootstrap-table/css/*.*'},
        to: './css',
        flatten: true
      }
    ]),

  ],

  module: {
    loaders: [
      {
        // We use babel for transpiling all es6/jsx code into es5
        loader: 'babel-loader',
        test: /\.(jsx|js)$/,
        exclude: /node_modules/,
        query: {
          plugins: ['transform-runtime'],
          presets: ["react", "es2015", "stage-2"]
        },
      },
      {
        // We will use the eslint-loader to provide linting
        loader: 'eslint-loader',
        test: /\.(jsx|js)$/,
        exclude: /node_modules/,
        query: {
          presets: ["react", "es2015", "stage-2"]
        }
      },
      {
        test: /\.exec\.js$/,
        use: [ 'script-loader' ]
      }
    ],
  },
};
Here we use webpack to define entry points, and from there webpack will bundled up all the required files in two output files. We use plugins to copy patternfly assets into our static/build folder, we also make jquery globablly accessible (optional) so we may use it throughout our project without the need for requiring it. Finally, we use loaders to help with linting and transpiling.
Add another file called .eslintrc in your root path for your linting configs:
.eslintrc
{
  parser: "babel-eslint",
  "plugins": [
    "react"
  ],
  "env": {
    "browser" : true,
    "jquery" : true,
    "es6" : true,
    "commonjs" : true
  },
  "rules":{
  },
  "extends": ["eslint:recommended", "plugin:react/recommended"],
  "globals": {
    "__dirname": true
  }
}
Add the library to your project
Create the javascript library in your app folder.
Run the following command from project root to add the library as a submodule to your project:
git submodule add https://github.com/zmhassan/reactjs-redux-patternfly-library app/javascript/pf-lib
You will now have a new folder called pf-lib in your javascript folder. If you cd into this folder, you will notice that it acts as though it is it's own repo (which it is), you can add/commit/push from it separate from your other projects.
React/Redux
Create the following files in app/javascript:
main.js:
//PatternFly JS Dependencies Entry

//jQuery
//execute files in global context with script-loader: https://github.com/webpack/script-loader
import 'script-loader!../../node_modules/patternfly/node_modules/jquery/dist/jquery.min';

//Bootstrap JS
import '../../node_modules/patternfly/node_modules/bootstrap/dist/js/bootstrap.min';

//Patternfly JS
import '../../node_modules/patternfly/dist/js/patternfly.min.js';
This file will import all the patternfly/bootstrap scripts we need.
store.js
import { createStore, combineReducers, applyMiddleware } from "redux";
import thunk from 'redux-thunk';

import messageReducer from "./pf-lib/message/messageReducer";
import modalReducer from "./pf-lib/modal/modalReducer";

export default createStore(
  combineReducers({
    modalReducer,
    messageReducer,
  }),
    applyMiddleware(thunk)
);
This is our redux store, it is required by the modal and status messages library utilities.
configs.js:
import main_page from "./main_page/main_page.jsx";
import second_page from "./second_page/second_page.jsx";

export const viewsConfig = [
  // Insert views and their path mappings
  {component: main_page, path: '/'},
  {component: second_page, path: '/second_page'},];

export const navbarConfig = {
  // The different tabs and the link to where they are routed to.
  categories: [
    {title: 'Main Page', link: '/'},
    {title: 'Second Page', link: '/second_page'},],
  // The title image placed at the top, above nav.
  titleSrc: {
    path: '../static/build/img/brand.svg',
    alt: 'Patternfly Demo App',
    useImage: true,
  }
};
This file will provide the configuration for the Navbar and Appcontainer in the library.
index.jsx
import { render } from "react-dom";
import React from "react";
import { Provider } from "react-redux";
import App from "./pf-lib/appContainer/App.jsx";
import store from "./store";
import {viewsConfig, navbarConfig} from './configs'

render (
  <Provider store={store}>
    <App viewsConfig={viewsConfig} navbarConfig={navbarConfig}/>
  </Provider>, document.getElementById('root')
);
And finally this is our entry point for our app as outlined in the webpack config.
Now that our app is hooked up, we need to simply create our 2 views, import them into index.jsx and the app will be ready to run. Create the following files in their respective directories:
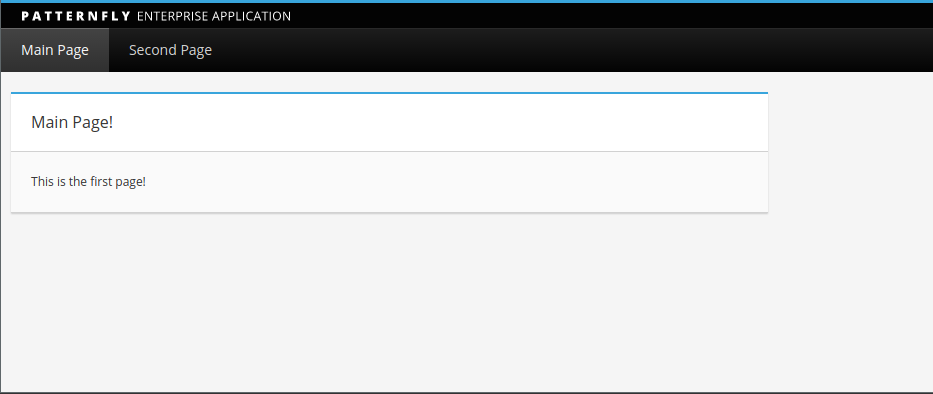
app/javascript/main_page/main_page.jsx
import React, { Component } from "react";

export class main_page extends Component {

  render() {
    let pageContent = <p>This is the first page!</p>;
    return (
      <div className="col col-cards-pf container-cards-pf fader">
        <div className="cards col-xs-10 col-md-8 ">
          <div className="card-pf card-pf-accented">
            <div className="card-pf-heading c">
              <h2 className="card-pf-title">
                Main Page!
              </h2>
              <div className="card-pf-footer">
                {pageContent}
              </div>
            </div>
          </div>
        </div>
      </div>
    )
  }

}


export default main_page
app/javascript/second_page/second_page.jsx
import React, { Component } from "react";

export class second_page extends Component {

  render() {
    let pageContent = <p>This is the second page!</p>;
    return (
      <div className="col col-cards-pf container-cards-pf fader">
        <div className="cards col-xs-10 col-md-8 ">
          <div className="card-pf card-pf-accented">
            <div className="card-pf-heading c">
              <h2 className="card-pf-title">
                Second Page!
              </h2>
              <div className="card-pf-footer">
                {pageContent}
              </div>
            </div>
          </div>
        </div>
      </div>
    )
  }
}


export default second_page
Once done, copy paste the following css code into a custom css file main.css as follows:
app/backend/static/main.css
.navbar > .container {
  padding-right: unset;
  padding-left: unset;
  margin-right: unset;
  margin-left: unset;
  width: auto;
}

.navbar-brand {
  margin-left: 20px !important;
}

.container > .navbar-collapse {
  margin-left: 0;
  margin-right: 0;
}

.container > .navbar-header {
  margin-left: 0;
  margin-right: 0;
}

.fade-leave {
  opacity: 1;
}

.fade-leave.fade-leave-active {
  opacity: 0;
  transition: opacity 1s ease-in;
}

.fade-enter {
  opacity: 0;
}

.fade-enter.fade-enter-active {
  opacity: 1;
  transition: opacity 1s ease-in;

}

.fade-height {
  transition: height .5s ease-in-out;
}
Now go to your project root and run the following:
npm run build
python app/backend/server.py
Now visit localhost:8081 and you should see a navbar, and 2 pages you can navigate between. To add another view simply add the additional lines to the navbar & app configs in configs.jsx.